LOG vs. RAW. This is a discussion that keeps on cropping up throughout the industry. With so many incredible new cameras offering different formats and ways of recording footage, it can be hard to keep up. If you’re just getting started, understanding the whole ‘LOG vs. RAW’ thing may well be a little daunting.
So, we’re here to help by breaking things down with the essential guide to shooting in LOG and shooting in RAW.
What is LOG video format? What is RAW footage? Which is best? You may have even heard some people claim that both are practically the same. The answer is … a bit of yes and no. Essentially, both RAW and LOG are designed to produce very flat footage that gives you the best options for color grading. Both do a great job in this, but there are some key differences.
How our cameras record
To fully come to grips with LOG vs. RAW, we need to understand what’s happening inside our cameras when we press record. Inside our cameras is a single CMOS sensor. Nearly all of these sensors will be using a Bayer pattern array of photosites. “What’s a photosite?” I hear you ask. Well, photosites are simply light collectors. They hold light for a moment before converting that light into a digital signal that can be read by the electronics within your camera.

Image by: en:User:Cburnett (CC BY-SA 3.0)
And the Bayer pattern? It was named after Bryce Bayer, a Kodak color scientist who developed the system we now call the Bayer pattern. Basically, this pattern is a checkerboard filter that separates light according to red, blue and green wavelengths (which is why you see RGB used so much in color grading). Each photosite captures the light that travels through your lens and hits the sensor, converting it to data that is separated according to the color components. This allows your camera to capture a wide exposure of light from dark shadows to bright highlights, but the data is a lot more than can be squeezed into a standard video format.
Still with us? Okay. This raw data is converted into RGB video by your camera’s electronics, and then it’s converted into a digital video format, recorded using a codec (like H.264 .MP4) and color sampling scheme such as 4:2:2. In this conversion process, the data is compressed, and inevitably, some information is lost. Shooting in RAW or LOG video format is a way to preserve more of the information and extend the dynamic range.
What is RAW footage?
In simple terms, RAW footage is not video. RAW takes the data from the photosites and records all of it before the camera initiates any conversion to video format, codecs or color sampling schemes. Every camera out there has a RAW step in the image-capturing process. Every camera has to gather that sensor information before it can be converted into a video output, but only some cameras will allow you to tap into and record that RAW data.
And remember―because it’s quite literally RAW data, it simply isn’t viewable on a monitor. To make it viewable, the data has to be converted to a video first using something known as the “de-Bayer process,” during which the color and brightness for each finished pixel in your captured image are determined. The key difference with RAW is that the conversion into video is not taking place in the camera or an external monitor but rather with post-editing software.
As you can imagine, the conversion of all this RAW information into video can be very time-consuming, given how large the resulting files are. However, there are some really useful tools out there to make it easier, and software is getting better at dealing with it every day. Obviously, the great advantage of RAW footage is that no video processing has been baked into the image. There’s no white balance, ISO or other color adjustments. When you couple this with a high bit rate, you find yourself being able to make huge adjustments and really play around in the color grading process.
What is LOG footage?
Most cameras nowadays - whether mirrorless, DSLR or cinema cameras - are starting to offer shooting in LOG modes as a standard feature. When you shoot in a LOG format (Sony’s S-Log3, for example), the image becomes very flat and desaturated. As we said, it’s all about giving you the best image for color grading purposes in post-production.
LOG footage was invented by Kodak with their Cineon system for scanning film. This system scanned film into a LOG format that corresponded with the density of the original film, thus maximizing the amount of information from the film that could be stored in a video format. This information was in very low contrast and needed to be ‘corrected.’ Sound familiar?
Whether it’s Panasonic, Sony, Canon or ARRI, all camera manufacturers have taken this idea of LOG film-scanning and applied it to their own camera sensors. When shooting in their specific LOG modes (S-Log, Canon Log, LOG C, etc.), a LOG gamma curve is pulling the most information possible off of the camera’s sensor.
So, how does shooting in LOG differ from shooting RAW footage? It’s important to remember that LOG is still a video format. So, unlike shooting RAW, you’ll still be able to see LOG footage on an external monitor without a conversion step. Additionally, because it’s a video format, certain things such as white balance and exposure are going to be baked in. However, it’s a lot flatter and captures far more dynamic range than if you were just shooting in the standard factory-setting picture profile for your camera.
LOG vs. RAW. Which is best?
Now that we’ve answered the questions of how RAW shooting works and what LOG footage is, we come to the ultimate question: Log vs. RAW―which is best? Ultimately, it all depends on your own needs and the nature of the project you’re working on.
Shooting RAW has an advantage in the sense that it is raw, uncompressed data. Nothing has been baked in like white balance, exposure and ISO. It is what the sensor sees, untouched. However, you can’t view this RAW data on a monitor while shooting. That’s a drawback. Furthermore, because it’s RAW, the file sizes tend to be rather large!
Shooting in LOG has a slight disadvantage in the sense that it is still a compressed video format, and certain elements will be baked in. However, it’s still really flat footage with tons of information. This, coupled with the fact that you can see it on your monitor immediately and its smaller file sizes, makes it the more appealing option for most day-to-day productions. If you’re working on a project for YouTube or any other online streaming platform, shooting in LOG is probably more than enough.
We’re not sure that RAW is totally necessary unless you’re a perfectionist. Of course, if you’re working on a big-budget Hollywood production or a blue-chip BBC natural history documentary, RAW does have its place. We think that whichever you opt for, both are fantastic in achieving the overall goal of providing a flat image that’s perfect for color grading. The choice is yours!
How to get started on editing RAW files
The truth is that editing RAW files is not easy, especially for beginners. You’ll need to consider the demands of working with RAW before choosing to go that route.
First, take a look at your computer’s specs. Of course, you’ll need a dedicated GPU to speed things up. Certain GPUs are designed to provide real-time playback of certain RAW formats, and they offer amazing performance, but they’re also eye-wateringly expensive. What’s more, your CPU will also need to be up to scratch, and you’ll need sufficient (large) amounts of RAM and storage to prevent lags and crashes.
Storage is a big concern. RAW data is massive. Even with decent compression ratios, you’ll be burning through multiple gigabytes per minute. Yikes. You’ll have to think about the increased costs for storing all of these huge files, as well as how long it takes to transfer them and back them up. You’ll also need to factor in the knock-on effect of longer, slower turnaround times on post-production.
Now, there is some good news on the RAW side. Many RAW formats (ProResRAW, Blackmagic RAW, REDCODE RAW, etc.) are improving all the time, enabling the decoding process to proceed a lot faster and more efficiently than in previous iterations. On top of this, you’ve got GPUs that are becoming faster and more powerful, post-production software that is integrating these GPUs power a lot better and the ever-tumbling cost of ultra-fast SSDs and hard drives.
How to get started on editing LOG files
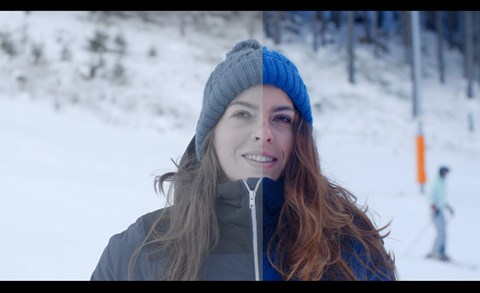
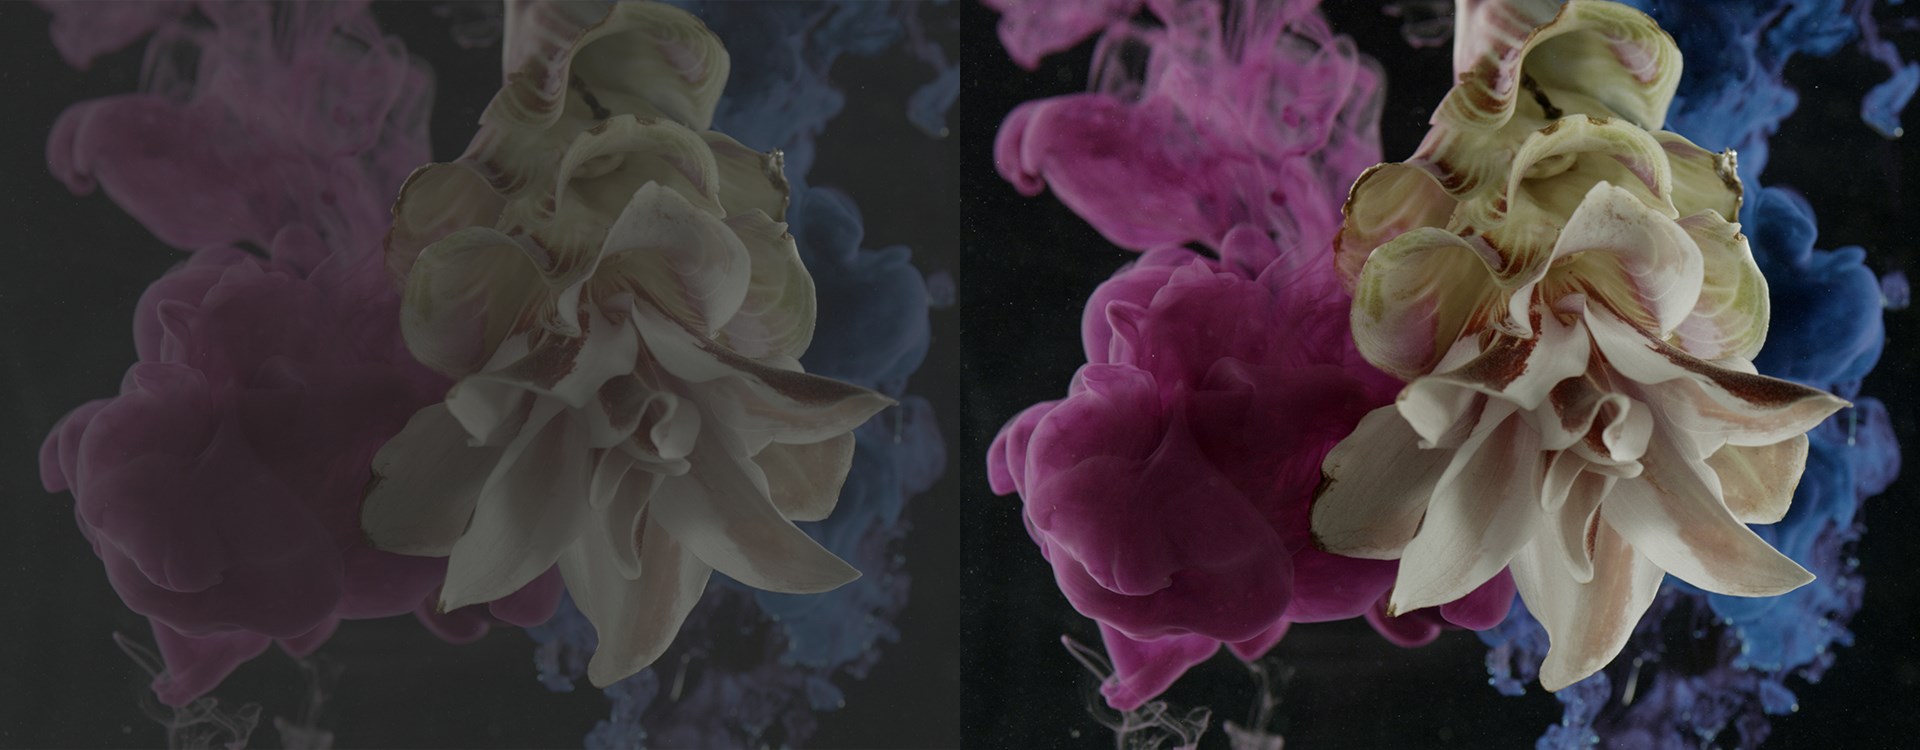
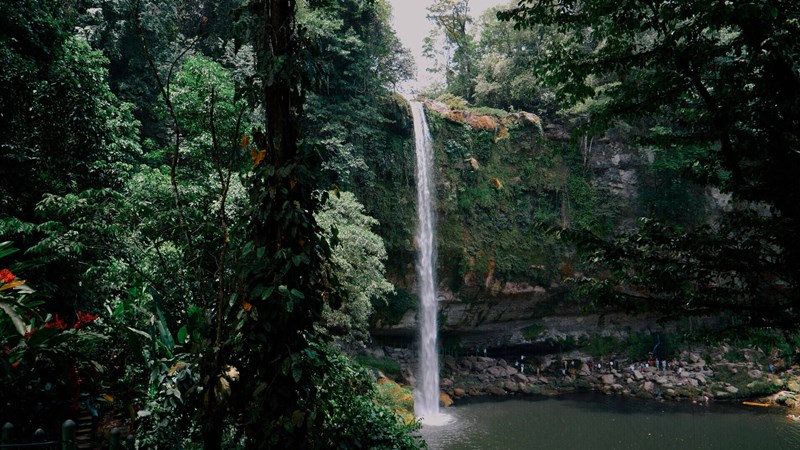
The good news with LOG video format is that it’s a lot easier to jump straight into editing. There are 2 steps to the post-production process. First, you’ll want to color correct. Second, remember that when shooting in LOG, your footage is going to be very flat. There won’t be much contrast or saturation at all. It’s up to you to bring this back in post. You can see this in the examples shown below, both sourced from Artgrid:

On Artgrid, you’ll find that the library of footage is stocked full of LOG footage ranging from high-quality 4:2:2 to extra-high-quality 4:4:4, as well as plenty of stock video clips in RAW. So get started with royalty-free LOG & RAW stock footage by downloading some of these clips and practicing today.
To correct these images, I focused on the white balance, the contrast between the highlights and shadows, and the colors’ saturation. For a full breakdown of this, check out the guide on how to color correct your videos.

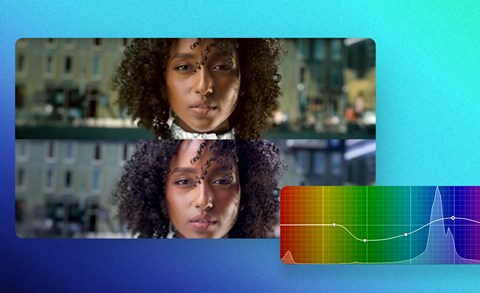
Once your image is in a place that looks “natural” to your eye, it’s time to color grade. This is where you introduce a grade that can set your work apart from others, helping to establish a mood and communicate emotions in your films. Because your LOG video format has so much information, you’ll find that you’re able to really play around with the footage and grade it exactly how you want without a loss of quality.
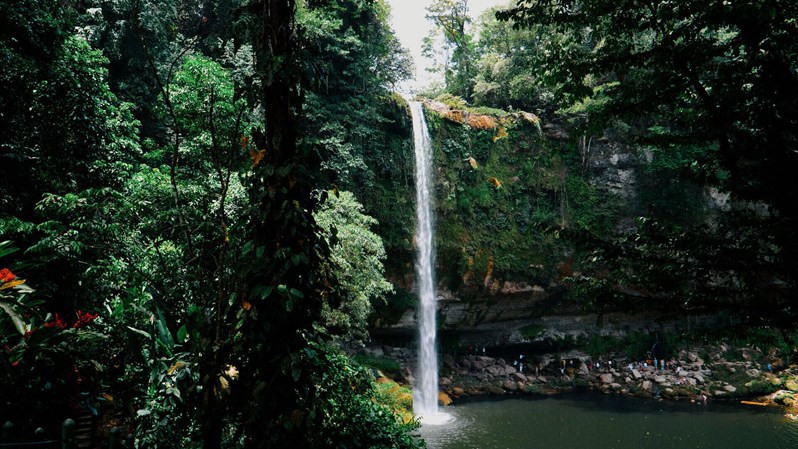
Below, you can see how a color grade changed my sample stock footage from Artgrid:

For more on grading, Check out our article giving you color grading tips and one about color grading mistakes beginners make.
Wrapping up
So, that’s your essential guide to LOG vs. RAW! We’ve answered the big questions such as what RAW footage is and what LOG means while showing you the benefits and drawbacks of using both. Next time your peers and colleagues are talking about shooting flat, S-Log video, you’ll be able to jump right in.
Everyone has different preferences and needs, but ultimately, we think shooting with the LOG video format is the easier, more mainstream option. But don't underestimate RAW’s potential growth over the next decade. Whichever you opt for, you’ll be shooting flat, and that makes for the best base for effective color grading in post-production.